Step by step guide on how to Enable SSL to your blog
Enable SSL for your blogger blog with your custom domain.., as everybody knows google didn't enable the SSL protocol for blogs in blogger when you use it with a custom domain so that you will lose your https link once you change from www.yourblog.blogspot.com to www.yourblog.com
Additional to adding more security to your website and gaining more trust by your website's visitors, having HTTPS helps you to rank faster withing search engines.Seo is not just about using a good Focus keyword and content, also secured websites are more preferred with search engines.
Read article: how to do the best keyword research for your website
Benefits of having SSL certificate
- you will make your blog looks much more professional.
- you will have a secure connection between your blog and visitors.
- you will make your blog faster using CDN.
- you will improve your blog’s ranking on Google and other search engines.
You just need to follow this steps to have your HTTPS applied to your blogger custom domain
1. Add Cloudflare CDN On your blog:
This is the very first step of the guide. You have to follow this steps to add Content Delivery Network on your blog.
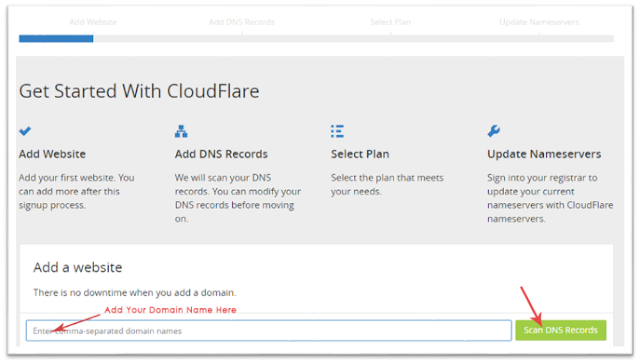
- You need to create an account on Cloud Flare then Add your domain to it and click on Scan DNS Records as shown in the image.it will take few minutes to finish the scan.
- Go to your Domain dashboard or My Account page, then to Domain’s Setting
- you will find something like “change nameservers” or an option that includes nameservers changing on it.
- Now you need to select “Custom Nameservers” and add the Cloudflare’s nameservers which are provided by Cloudflare.
- Now after changing name servers for your domain, it means that your domain now is using Content Delivery Network.
2-Enable SSL Certificate (HTTPS) On Your Domain:
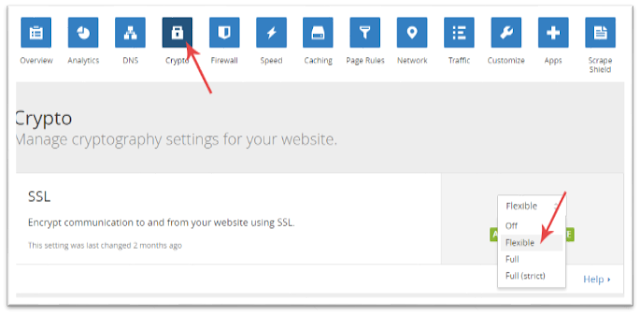
Now you need to enable the https to your domain, it is the main part of our guide, you will do it using CloudFlare's control panel as shown below.
- Open the “Crypto” tab on CloudFlare’s Account page.
- Now select the “Flexible” option at the SSL section.
- Finally, you are done now with adding HTTPS to your domain name.
3-Redirecting your domain, sub-domains, and Permalinks from HTTP to HTTPS:
This is the critical part of the guide, follow the steps as shown below carefully to complete the guide with no problems.
Go to “Page Rules” tab and add 3 Page Rules as shown in below images.and remember to change “bloggerguider.com” to your Domain name.
Now after adding the 3-page rules you should go the firewall tab then in the security level select the low option.
you are done now with Cloudflare time to do some final edits on your blogger.
You may now see that your blog is redirecting from HTTP to https, but it is now fully redirected yet.
You have now to go to your blog HTML Editor by going to your blogger control panel then Theme Then Edit HTML.
Search for the code
You can do it by pressing CTRL+F and search for it then paste the following code above it
After that you will need to find this code in your blog using the same ctrl+f method
Remove it then add the following code bellow the tag
and now change the 3 www.yourdomain.com to your domain name
and BLOGID to your blog id which can be found as shown in the image below
Now you should save your template
4- fixing the Mixed Content issues after adding SSL:
Now you go visit your blog using google chrome ( https://www.yourblog.com)
Then press CTRL+Shiftusuallylly you will find some mixed content errors that will look like this:
Content: The page at ‘https://.blogspot.com/’ was loaded over HTTPS, but requested an insecure script ‘http:///script.js’. This request has been blocked; the content must be served over HTTPS.”
you should now go visit Fix mixed content on your blog on google support and you will find a simple guide on how to fix it very easily
Important notes :
Sometimes you may find a mixed content error caused because of the favicon or the head image of your website or any other image ,, if that happened you may use a good external secured host for images and then use it's link , i recommend postimage Wich is fully secured
In some cases when you use your search widget in the blogger you may find a mixed content error that will like like this :
Mixed Content: The page at ‘http://howtoshout.com/‘ was loaded over a secure connection, but contains a form which targets an insecure endpoint ‘http://howtoshout.com/search’. This endpoint should be made available over a secure connection.
in this case you need to do a small fix in your html :
find the code :
And change it with this code :Then save your HTML
Congratulations your blog is now fully secured with SSL and show as HTTPS


No comments:
Post a Comment